Scottish Health Survey 2015 - volume 2: technical report
Details of the methodology and fieldwork for the Scottish Health Survey 2015.
This document is part of a collection
3 Height Measurement
3.1 Introduction
The height measurement is a measure of anthropometry, which provides information on the size and proportions of the human body. When taken in conjunction with other anthropometric measures it is an indicator of, and can predict, the nutritional status, performance, health and survival of a population and can thus be used to determine public health policies. Moreover, height is often used as an indicator of people's quality of life. This is based on evidence that final height is a combination of genetic and environmental factors, where a taller population is indicative of a better quality of life due to access to health services and nutrition.
3.2 Exclusion criteria
Participants are excluded from the height measurement if:
- They are pregnant
- They are too stooped to obtain a reliable measurement
- After a discussion with the Participant it becomes clear that they are too unsteady on their feet
- They are chair bound
- If the Participant finds it painful to stand or sit up straight
3.3 Equipment
You will need:
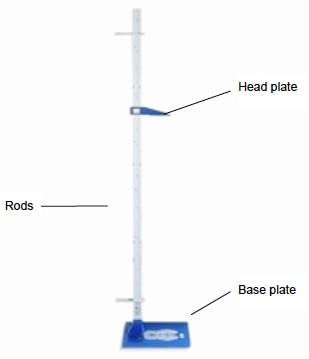
- A portable stadiometer (see figure 1 below) (base plate, upright rods, head plate and stabilisers)
- A Frankfort Plane card
- Milton wipes
Figure 1 The stadiometer

3.3.1 Caring for the stadiometer
The stadiometer will be sent to you in a box. Always store the stadiometer in the box when it is not in use and always pack the stadiometer carefully in the box whenever you are sending it on by courier. Inside the box with the stadiometer is a special bag that you should use for carrying the stadiometer around when you are out on assignment. You may also request a wheeled holdall from the Equipment Supervisor at Brentwood to transport the stadiometer and weighing scales.
The rods
There are four plastic connecting rods marked with a measuring scale divided into centimetres and then further subdivided into millimetres. They should be put together in the correct order with the same coloured markings running along each side. The rods are made of plastic and are susceptible to bending if any pressure is put on them. Be careful not to damage the corners of the rods as this will prevent them from fitting together properly and will lead to a loss of accuracy in the measurements.
The base plate
Be careful not to damage the corners of the base plate as this could lead to a loss of accuracy in the measurements.
Protruding from the base plate is a socket into which you attach the rods in order to assemble the stadiometer. Damage to the corners of this socket may mean that the rods do not stand at the correct angle to the base plate when the stadiometer is assembled and the measurements could be affected.
The head plate
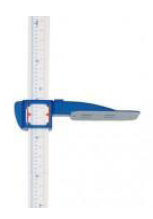
The head plate is made up of the blade and the cuff. The blade is the part that rests on the Participant's head while the measurement is taken and the cuff is the part of the head plate that slips over the measurement rods and slides up and down the rods. The whole unit is made of plastic and will snap if subjected to excessive pressure. Grasp the head plate by the cuff whenever you are moving the head plate up or down the rods, this will prevent any unnecessary pressure being applied to the blade which may cause it to break.

3.3.2 Assembling the stadiometer
Practise assembling your stadiometer before you visit a Participant's home.
You will receive your stadiometer with the four rods stored into the base plate and the head plate attached to the base plate so that the blade lies flat against the base plate. Once working you should store the head plate in the jiffy bag given to you to protect it further - as this is the component likely to break first with use.
Note that the rods are numbered/have symbols to guide you through the stages of assembly. (There is also an asset number identified on the base plate, this is the serial number of the stadiometer which is logged out to you).The stages of assembly are as follows:
1.Lie the base plate flat on the floor area where you are to conduct the measurements. It should be as flat as possible, ideally on an uncarpeted floor or with a thin carpet; you should avoid a deep pile carpet or rug if at all possible.
2. Take the rod marked with the arrows showing it's position into the base plate. Making sure the measuring scale is on the right hand side of the rod as you look at the stadiometer face on, place rod into the base plate socket. It should fit snugly without you having to use force.
3. Place one of the two stabilisers over the first, ensuring that the stabiliser faces the wall / door frame or other upright surface being used to measure against. The stabilisers ensure that the rod is as perpendicular as possible to enable accurate measurement.
4. Take the rod marked *. Again make sure that the measuring scale connects with the scale on the first rod and that the symbols match at each rod connection / junction. (If they do not, check that you have the correct rod).
5. Take the remaining two rods and put them together in order (matching the connecting symbols). Place the second stabiliser on the 3 rd rod, but not at the level that the Participant height might be measured at.
6. Wipe the head plate and base plate with a Milton wipe and allow to dry for 30 secs.
3.3.3 Dismantling the stadiometer
Follow these rules:
1. Before you begin to dismantle the stadiometer you must remember to lower the head plate to its lowest position, so that the blade is lying flat against the base plate.
2. Remove one rod at a time.
3. Wipe the head plate and base plate with a Milton wipe and allow to dry for 30 secs. Before packing rods back into the base plate and head plate into the jiffy bag.
3.4 Procedure for adults
1. Ask the Participant to remove their shoes and loosen any hair accessory if possible ( e.g. large hair grips; head bands, pony tail holders etc).
2. Assemble the stadiometer, near a wall if possible, and raise the headplate to allow sufficient room for the Participant to stand underneath it. Double check that you have assembled the stadiometer correctly.
3. Ask the Participant to stand with their feet flat on the centre of the base plate, feet together and heels against the back of the base plate as this helps people to 'be at their highest'. The Participant's back should be as straight as possible, preferably against the rod but NOT leaning on it. They should have their arms hanging loosely by their sides. They should be facing forwards.
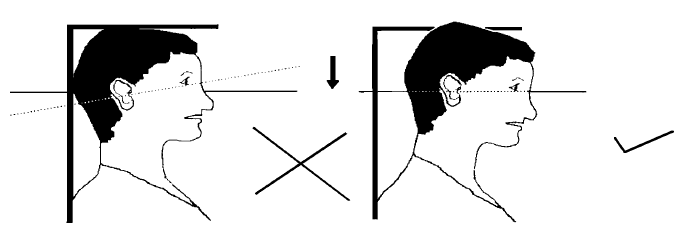
4. Move the Participant's head so that the Frankfort Plane is in a horizontal position ( i.e. parallel to the floor). The Frankfort Plane is an imaginary line passing through the external ear canal and across the top of the lower bone of the eye socket, immediately under the eye (see Figure 2). This position is important if an accurate reading is to be obtained. An additional check is to ensure that the measuring arm rests on the crown of the head, i.e. the top back half. To make sure that the Frankfort Plane is horizontal, you can use the Frankfort Plane Card to line up the bottom of the eye socket with the flap of skin on the ear. The Frankfort Plane is horizontal when the card is parallel to the stadiometer arm.
Figure 2 The Frankfort Plane

5. Instruct the Participant to keep their eyes focused on a point straight ahead, and without moving their head position, to breathe in deeply and stretch to their fullest height. Bring the head plate gently down onto the Participant's head. If after stretching up the Participant's head is no longer horizontal, repeat the procedure. It can be difficult to determine whether the stadiometer headplate is resting on the Participant's head. If so, ask the Participant to tell you when s/he feels it touching their head.
6. Once the head plate is in place tell the Participant to relax, breathe out, and ask them to step forwards away from the stadiometer. If the measurement has been done correctly the Participant will be able to step off the stadiometer without ducking their head. Make sure that the head plate does not move when the Participant does this.
7. Look at the middle of the head plate cuff. There is a red or black arrowhead pointing to the measuring scale. Take the reading from this point and record the Participant's height in centimetres and millimetres. If a measurement falls between two millimetres, it should be recorded to the nearest even millimetre (see section 2.4.).

8. If the Participant wishes, record their height onto the measurement record card.
9. Push the head plate high enough to avoid any member of the household hitting their head against it when getting ready to be measured. Once you have finished measuring everyone, lower the head plate to its lowest position, ready for dismantling.
3.5 Procedure for children (2-15)
The protocol for measuring children aged 2-15 differs slightly from that for adults. You must get the co-operation of an adult household member. You will need their assistance in order to carry out the protocol, as children are more likely to be co-operative themselves if another household member is involved in the measurement. If possible measure children last so that they can see what is going on before they are measured themselves.
Children's bodies are much more elastic than those of adults. Unlike adults they will need your help in order to stretch to their fullest height. This is done by stretching them. This is essential in order to get an accurate measurement. It causes no pain and simply helps support the child while they stretch to their tallest height.
1. Explain to the parent and child what you will be doing, and ensure that both are happy with the procedure.
2. In addition to removing their shoes, children should remove their socks as well to ensure that they do not slip on the base of the stadiometer, and so that you can easily check their feet are flat on the base plate, not on tiptoes.
3. Assemble the stadiometer and raise the head plate to allow sufficient room for the child to stand underneath it.
4. Ask the child to stand with their feet flat on the centre of the base plate, feet together and heels against the rod. The child's back should be as straight as possible, preferably against the rod, and their arms hanging loosely by their sides. They should be facing forwards.
5. Place the measuring arm just above the child's head.
6. Move the child's head so that the Frankfort Plane is in a horizontal position (see diagram). This position is as important when measuring children as it is when measuring adults if the measurements are to be accurate. To make sure that the Frankfort Plane is horizontal, you can use the Frankfort Plane Card to line up the bottom of the eye socket with the flap of skin on the ear. The Frankfort Plane is horizontal when the card is parallel to the stadiometer arm. Explain what you are doing and tell the child that you want them to stand up straight and tall, but not to move their head or stand on their tiptoes. Ask them to look straight ahead.
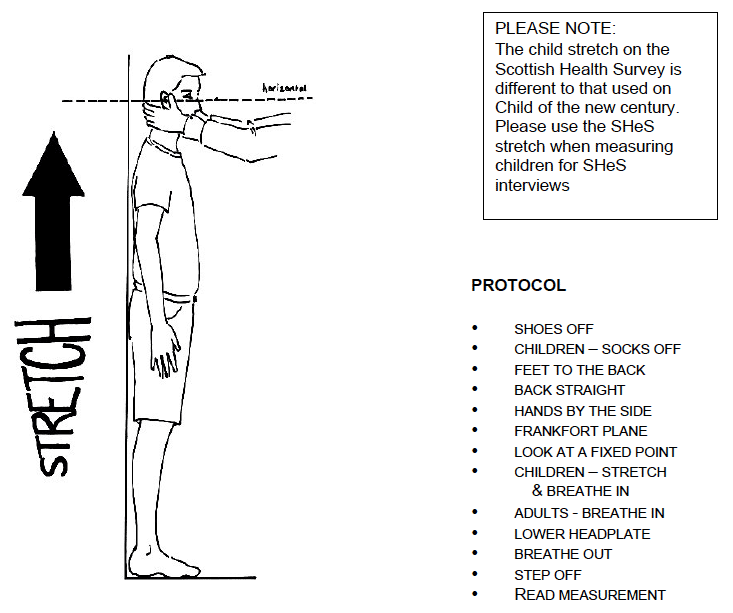
7. Cup the child's head in your hands, placing the heels of your palms either side of the chin, with your thumbs just in front of the ears, and your fingers going round towards the back of the neck. (See diagram below).
8. Ask the child to breathe in. Firmly but gently, apply upward pressure lifting the child's head upwards towards the stadiometer head plate and thus stretching the child to their maximum height. Avoid jerky movements, perform the procedure smoothly and take care not to tilt the head at an angle: you must keep it in the Frankfort plane.
9. Ask the household member who is helping you to lower the head plate down gently onto the child's head. Make sure that the plate touches the skull and that it is not pressing down too hard.
10. Still holding the child's head, relieve traction and allow the child to stand relaxed and breathe out. If the measurement has been done properly the child should be able to step off the stadiometer without ducking their head. Make sure that the child does not knock the head plate as they step off.
11. Read the height value in metric units to the nearest millimetre (see sention 2.4) and enter the reading into CAPI.
12. If the Participant wishes, record the reading on the child's measurement record card.
13. Push the head plate high enough to avoid any member of the household hitting their head against it when getting ready to be measured.
REMEMBER YOU ARE NOT TAKING HEIGHT AND WEIGHT MEASUREMENTS FOR CHILDREN UNDER 2 YEARS OLD

3.6 Additional points
- Some surveys require the Participant to be measured more than once; this will be stated in the project specific instructions. The protocol for taking the additional height measurements remains the same. Both measurements are to be recorded in CAPI and if they differ significantly CAPI will instruct you to take a third measurement.
- If the Participant cannot stand upright with their back against the stadiometer and have their heels against the rod ( e.g. those with protruding bottoms) then give priority to standing upright.
- If the Participant has a hair style which stands well above the top of their head, or is wearing a religious head dress, with their permission, bring the headplate down until it touches the hair/head dress. You should never ask someone to remove a religious head dress. With some hairstyles you can compress the hair to touch the head. If you cannot lower the head plate to touch the head and think that this will lead to an unreliable measure, record this on CAPI. If it is a hairstyle that can be altered e.g. a bun, if possible ask the Participant to change/undo it.
- If the Participant is tall, it can be difficult to line up the Frankfort Plane in the way described. When you think that the plane is horizontal, take one step back to check from a short distance that this is the case.
- You may need to tip the stadiometer to read the height of tall Participants.
- If the Participant has long hair then they may need to tuck it behind their ear in order for the head to be positioned properly. Always ask the Participant to tuck their hair behind their ears.
Contact
Email: Julie Landsberg, julie.landsberg@gov.scot
There is a problem
Thanks for your feedback