Scottish Health Survey 2015 - volume 2: technical report
Details of the methodology and fieldwork for the Scottish Health Survey 2015.
This document is part of a collection
7 Blood Pressure
7.1 Introduction
Blood pressure is the exertion that the blood applies to the arterial walls as it is pumped through the circulatory system by the heart. Having a high blood pressure is an important risk factor for cardiovascular disease and stroke. The exact cause(s) of high blood pressure is not completely known; however some factors known to affect blood pressure are smoking,, family history, physical fitness and diet. It is important that we examine blood pressure using a standard method to see the distribution of blood pressure measurements across the population. This is vital for monitoring change over time.
7.2 Exclusion criteria
Participants are excluded from the blood pressure measure if they are:
- Pregnant (If a pregnant woman wishes to have her blood pressure measured, you may do so, but do not record the readings in CAPI)
7.3 Equipment
You will need:
- An Omron HEM 907 blood pressure monitor
- Child/ small adult cuff (17-22 cm)
- Standard adult cuff (22-32 cm)
- Large adult cuff (32-42 cm)
- An AC adapter
7.3.1 Using the Omron HEM 907
Figure 3 shows the monitor of the Omron
Figure 3 The Omron HEM 907 monitor
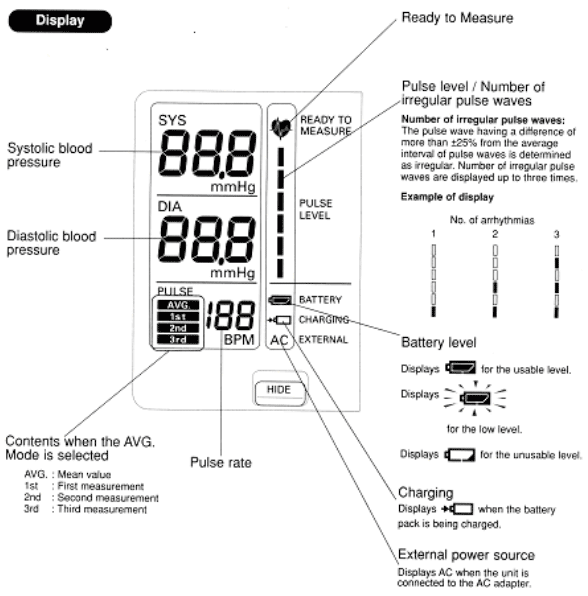
1. Switch the monitor on by pressing the ON/OFF button. Wait for the READY TO MEASURE symbol to light, indicating the monitor is ready to start the measurement (approximately 2 seconds).
2. Check that the MODE selector is set to AVG (average) and P-SET Volume (pressure setting) is set to auto.
3. Press the start button to begin the measurement. The cuff will start to inflate and take the first measurement. When the first measurement is complete, the LCD screen will show the systolic pressure, diastolic pressure and pulse rate. It will continue to do this at one minute intervals. The readings can be scrolled through at this point and should be recorded according to the project instructions, before the monitor is turned off.
4. Press the ON/OFF button to turn it off.
5. If at any stage while you are taking the measurement you need to stop the monitor, press STOP and start the procedure again.
7.3.2 Charging the battery
The Omron HEM 907 is equipped with a rechargeable battery, which is usable for approximately 300 measurements when fully charged.
When the battery symbol in the BATTERY display starts to flash you will need to charge the battery as soon as possible. When a light battery symbol appears in the BATTERY display the battery needs to be put on charge immediately.
To recharge the battery:
Connect the monitor to the mains. A battery symbol will appear in the CHARGING display when the battery is charging. When ready to use the symbol will disappear. A dark battery symbol in the BATTERY display indicates that the battery is charged and the machine is useable. The battery can be charged in approximately 12 hours.
Connect the AC adapter to the DC jack of the main unit and the electric outlet.
NOTE: when the AC adapter is connected and the unit is turned off, the AC adapter charges the installed rechargeable battery. The Omron 907 is NOT designed to work off the mains adaptor, it should be run off the battery power pack. The mains adaptor should ONLY be used to charge the battery pack.
Figure 4 Charging the battery

7.3.3 Technical faults/error readings
Refer to table below when error readings appear on the LCD screen.
Table 2 Troubleshooting for the Omron HEM 907
| Error No. |
Action |
|---|---|
| Er1, Er2 |
|
| Er3 |
|
| Er4 |
|
| Er5, Er6 |
|
| Er7, Er8 |
|
| Er9 |
|
7.4 Preparing the Participant
Before the procedure CAPI will instruct you to ask the Participant if they have eaten, smoked, drunk alcohol or participated in vigorous exercise in the past 30 minutes. You should note their response in CAPI.
Select the right arm unless this is impossible. Ask the Participant to remove outer garment ( e.g. jumper, cardigan, jacket) and expose their upper right arm by rolling up their sleeve. If the sleeve constricts the arm, restricting the circulation of blood, ask the Participant if they would mind taking their arm out of the sleeve for the measurement.
7.4.1 Selecting the correct cuff
Do not measure the upper arm circumference to determine which cuff size to use. Instead, choose the correct cuff size based on the acceptable range which is marked on the inside of the cuff. You will note that there is some overlap between the cuffs. If the Participant falls within this overlap range then use the standard cuff where possible.
7.5 Procedure
1. Ensure the Participant is sitting in a comfortable chair with a suitable support so that the right arm is resting at a level to bring the elbow to approximately heart level. They should be seated in a comfortable position with legs uncrossed and feet flat on the floor.
2. Place the monitor on a flat stable surface close to the Participant's right side and at the level of the heart. Position the monitor so that it faces away from the Participant.
3. Turn the monitor on.
4. Using the right arm, unless this is impossible, ensure that the upper arm is either exposed or has a single layer of thin clothing only. If the left arm is used, record this in CAPI.
5. Wrap the correct sized cuff round the upper right arm and check that the index line falls within the range lines. Do not put the cuff on too tightly as bruising may occur on inflation. Ideally it should be possible to insert two fingers between the cuff and the arm.
6. Position the arrow on the lower end of the cuff (near the elbow) over the artery just medial to the biceps muscle. The lower edge should be about 1-2 cm above the elbow crease.
7. Explain to the Participant that you need them to sit quietly for five minutes and that during that time they cannot talk, eat, drink or smoke.
8. After five minutes explain that you are starting the measurement, also explain that the cuff will inflate three times and each time they will feel some pressure on their arm. Ask them to relax, be seated in the position detailed in step 1 and not to speak until the measurement has been completed, as it may affect their reading.
9. Press start on the Omron HEM 907 to start the measurement. When the first measurement is complete it will be displayed on the LCD screen.
10. The unit will produce readings at one minute intervals thereafter, you will then have three sets of readings. A further (4 th) reading will appear which is the Average reading. All of these readings need to be recorded. To check the readings press the 'Deflation' button.
11. Record the measures into CAPI in the following order:
a. Average - the reading that the Omron shows you once the measures are all complete
b. 1 st - To show this press the grey 'deflation' button once.
c. 2 nd - To show this press the grey 'deflation' button again.
d. 3 rd - To show this press the grey 'deflation' button again.
If you press the deflation button again it scrolls back round to the 'Average' reading. It is important that three readings are recorded as the first reading is usually higher, and thus less accurate, than the other two readings as the Participant may be feeling nervous. NB - these must be recorded before the Omron turns itself off (after approx 3 mins) as the measures are not held in the memory then.
12. Press ON/OFF on the Omron to switch the unit off and remove the cuff from the Participant's arm.
13. If the Participant wishes, you should record details of their readings on the measurement record card.
14. Ensure that the cuffs stay clean. If the cuffs get soiled or you have concerns about potential or actual contamination dispose of the cuff and contact Brentwood for a replacement.
7.6 Participant feedback
When answering queries about a Participant's blood pressure it is very important to remember that it is NOT the purpose of the survey to provide Participants with medical advice, nor are you in a position to do so.
What you may say in each situation has been agreed with the Survey Doctor and CAPI will instruct you to read out the appropriate interpretations of the Participant's results. It is very important that the agreed script in the CAPI is read word for word and that personal interpretation is never offered.
The Participant feedback protocol should be strictly followed. It is very important that as little anxiety as possible is caused, but at the same time we have a duty to advise people to see their GP if the measurements indicate that blood pressure is raised.
7.6.1 Adult Participants
As stated previously we have a duty to inform people that they need to see their GP if their blood pressure is high. It is important that the instructions below are carefully read and guidelines always followed precisely.
The computer tells you which readings your advice should be based on. This will be based on the lowest systolic and lowest diastolic reading from the last two readings. This will usually, but not always, be from the same reading. For example, occasionally it may be the systolic from the second reading and the diastolic from the third reading. Furthermore if the lowest systolic reading falls in one category and the lowest diastolic reading falls in another category, the higher of the two categories will be used to trigger the advice to Participants. For example the lowest systolic reading is 138 (normal) and the lowest diastolic is 96 (mildly raised) then the advice given will be based on a mildly raised reading. If the first reading is higher than the other two it should be explained that the first reading can be high because people are nervous of having their pressure taken.
Definitions of raised blood pressure differ slightly. The Survey Doctor has recommended the blood pressure ratings given below based on the most recent guidelines from the British Hypertension Society. It is important that you adhere to these definitions, so that all Participants are treated in an identical manner. These are shown in table 3.
Table 3 Definition of blood pressure ratings
| ADULTS ONLY | |||
|---|---|---|---|
| SURVEY DEFINITION OF BLOOD PRESSURE RATINGS | |||
| For men and women aged 16+ | |||
| Rating | Systolic | Diastolic | |
| Normal | <140 | and | <90 |
| Mildly raised | 140 - 159 | or | 90 - 99 |
| Raised | 160 - 179 | or | 100 - 114 |
| Considerably raised | 180 or more | or | 115 or more |
Points to make to a Participant about their blood pressure (given on screen):
Normal:
'Your blood pressure is normal.'
Mildly raised:
'Your blood pressure is a bit high today.'
'Blood pressure can vary from day to day and throughout the day so that one high reading does not necessarily mean that you suffer from high blood pressure.'
'You are advised to visit your GP within 2 months to have a further blood pressure reading to see whether this is a one-off finding or not.'
Raised:
'Your blood pressure is a bit high today.'
'Blood pressure can vary from day to day and throughout the day so that one high reading does not necessarily mean that you suffer from high blood pressure.'
'You are advised to visit your GP or practice nurse within 2 weeks to have a further blood pressure reading to see whether this is a one-off finding or not.'
Considerably raised:
'Your blood pressure is high today.'
'Blood pressure can vary from day to day and throughout the day so that one high reading does not necessarily mean that you suffer from high blood pressure.'
'You are strongly advised to visit your GP or practice nurse within 5 days to have a further blood pressure reading to see whether this is a one-off finding or not.'
(For all of the above points, you can also advise the Participant to see their practice nurse, if this is who they would typically see in relation to their blood pressure.)
7.7 Action to be taken after the visit
If you need to contact the Survey Doctor, unless there is a hypertensive crisis, do not do this from the Participant's home - you may cause unnecessary distress.
7.7.1 Adults
Table 4 summarises what action to take based on the readings you have obtained for a Participant. For this purpose you should only take into account the last two of the three readings you take, as the first reading is prone to error.
Table 4 Action due to blood pressure readings
| BLOOD PRESSURE |
READING |
Interviewer ACTION |
|---|---|---|
| Normal Mildly raised Raised |
Systolic less than 180 mmHg and Diastolic less than 115 mmHg |
No further action necessary |
| Considerably raised |
Systolic at or greater than 180 mmHg or Diastolic at or greater than 115 mmHg |
Contact the Survey Doctor at the earliest opportunity and she will inform the Participant.* |
| If the Participant has any symptoms of a hypertensive crisis** contact the survey doctor immediately or call an ambulance. The Survey Doctor must be informed as soon as possible. |
* You must still contact the Survey Doctor even if Participants tell you that their GP knows about their raised BP.
** A hypertensive crisis is an extremely rare complication of high blood pressure. Its signs and symptoms include diastolic bp > 135 mmHg, headache, confusion, sleepiness, stupor, visual loss, seizures, coma, cardiac failure, oliguria, nausea & vomiting.
The Survey Doctor will look at all high or unusual readings when they reach the office. If the reading is high, then the Survey Doctor will contact the Participant directly. The Survey Doctor will also routinely check fast and slow pulse rates so no further action is necessary regarding these.
Contact details for your Survey Doctor can be found in the project instructions. The Survey Doctor is generally available from 8.00-22.00. Calls outside these hours are either unnecessary or an emergency, in which case, the survey doctor is unlikely to be in a position to do anything practical and you should be using your judgement whether to call an ambulance or seek other urgent advice.
Contact
Email: Julie Landsberg, julie.landsberg@gov.scot
There is a problem
Thanks for your feedback