Scottish Health Survey 2015 - volume 2: technical report
Details of the methodology and fieldwork for the Scottish Health Survey 2015.
This document is part of a collection
8 Saliva
8.1 Introduction
Saliva samples are taken from Participants for analysis to detect various chemical compounds (depending on the aims of the individual surveys) to provide information on peoples health and lifestyle. These compounds include:
- Cortisol, indicating an individual's stress levels.
- Cotinine, a derivative of nicotine showing levels of exposure to tobacco smoke.
8.2 Exclusion criteria
Participants are excluded from giving a saliva sample if they:
- Are pregnant
- Are HIV positive
- Have Hepatitis B or C
Do not ask for information regarding HIV and Hepatitis B or C, however if they volunteer it, record them as unable to give a sample and make a note.
8.3 Consent
There is a separate consent form for the saliva sample. This must be signed and dated by the Participant or by the parent or legal guardian in the case of children aged 15 years and below. Please make it clear to Participants that they will not receive results regarding their saliva sample (see section 2.5).
8.4 Preparing the Participant
Explain to the Participant what you will require them to do and the reasons behind why saliva samples are taken.
There are two different procedures that can be followed depending on the aims/requirements of the survey. Please refer to the project instructions for the preferred method.
8.5 Procedure One - dribbling into tube
8.5.1 Equipment
You will need:
- A plain 5ml tube
- Gloves
8.5.2 Procedure
1. Remove the cap from the plain tube. Give the tube to the Participant. Explain that you want him/her to collect their saliva in their mouth and then let it dribble into the tube. Ensure that you are not getting sputum i.e. they are not clearing their chest to collect their saliva.
2. Allow the Participant 3 minutes to do this, collecting as much as you can in this time. The saliva will be frothy and will look greater in volume than it actually is, so do not give up too soon. You need at least 0.5cm on depth in the tube, not including froth.
3. If a Participant's mouth is excessively dry and they cannot produce saliva allow them to have a drink of plain water. Wait for 5 minutes before collecting the sample to ensure that water is not retained when the sample is given.
4. Replace the cap on the tube and report any problems in CAPI. You should wear gloves at all times when you come in contact with a saliva sample.
5. Label and package as directed in the project specific instructions.
8.6 Procedure Two - using a salivette with cotton swab
8.6.1 Equipment
You will need:
- Salivettes
- Gloves
8.6.2 Procedure
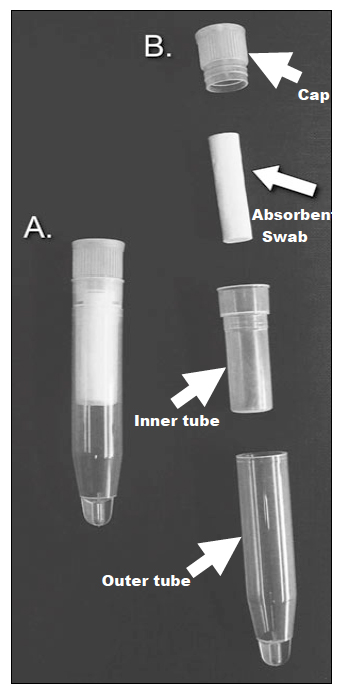
1. Figure 5 is a picture of a salivette. 'A' shows the salivette correctly assembled and 'B' shows the four different parts that it consists of: the cap, absorbent swab, inner tube and outer tube.
2. To obtain the saliva sample, remove the inner tube from the outer tube. Remove the cap from the inner tube and instruct the Participant to take the absorbent swab from the inner tube, without touching it, by lifting the tube to their lips and letting the absorbent swab fall into their mouth. Further explain that they must leave it in their mouth until it is saturated with saliva.
3. Ask them to move it around in their mouth, gently biting on it, as this helps to ensure thorough wetting of the absorbent swab. It will vary from person to person, however 3 minutes will usually be ample.
4. If a Participant's mouth is excessively dry and they cannot produce saliva allow them to have a drink of plain water. Wait for 5 minutes before collecting the sample to ensure that water is not retained when the sample is given.
5. When the absorbent swab is sufficiently wet, ask the Participant to remove it from their mouth and put the absorbent swab back into the inner tube, avoiding touching it if they can.
6. Wearing gloves, check that the swab is saturated. The tube should feel noticeably heavier than an unused one. If the swab rattles around in the tube then it is not wet enough and you need to give it back to the Participant to put back in their mouth.
7. Once you are satisfied that it is saturated replace the cap on the inner tube and put the inner tube back in the outer one (the inner tube has a hole in the bottom so will leak in the post if not placed in the outer tube). Record in CAPI any problems you may have had. You should wear gloves at all times when you come in contact with a saliva sample.
8. Label and package as directed in the project specific instructions.
Figure 5 'A': an assembled salivette, 'B': the various components

Contact
Email: Julie Landsberg, julie.landsberg@gov.scot
There is a problem
Thanks for your feedback